Customers Mail CloudのWebhookは2種類あります。
- メール受信時
- メール送信時
メール送信時は、送信したメールに対してステータスが変わったタイミングで通知が送られるものです。
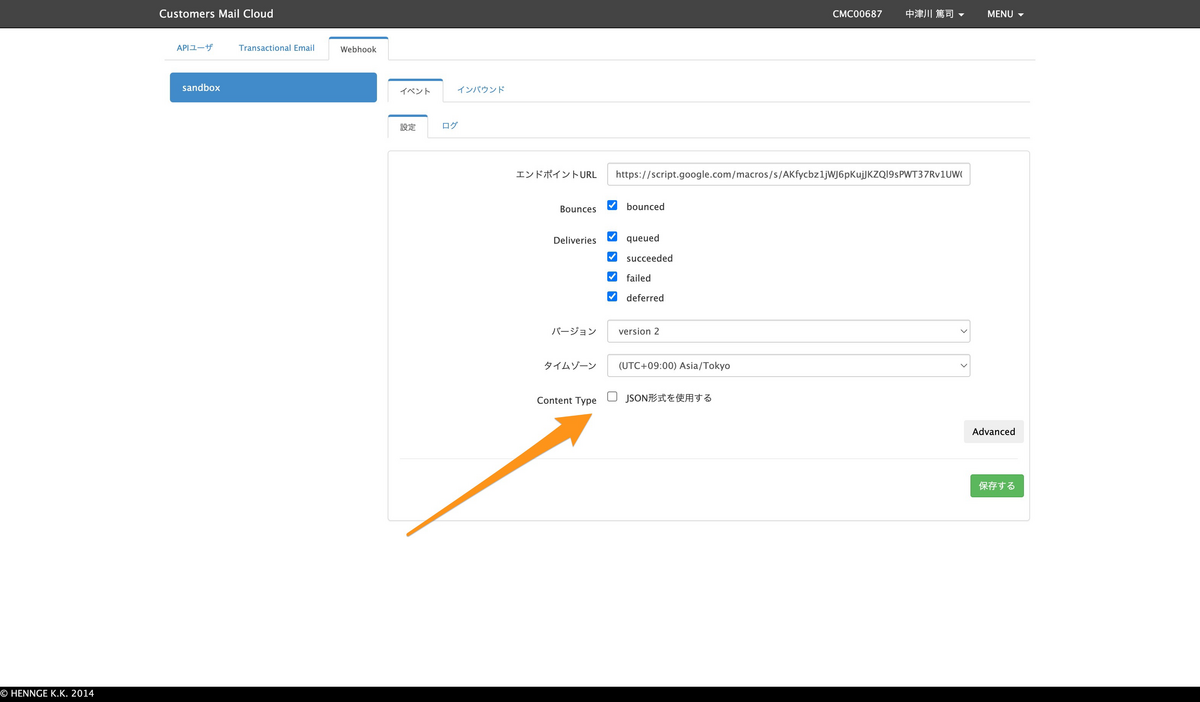
その際、 application/json を指定しない設定ができます。この時のデータがどうなっているのか紹介します。
<!—more—>
AWS Lambdaの準備
AWS Lambdaで新しい関数を作成します。その際、条件として以下を指定します。
- ランタイム
Java 21 - 関数 URL を有効化
チェックを入れる - 認証タイプ
NONE
関数の作成が完了したら、関数コードを編集します。ベースになるコードは以下の通りです。
package com.example.lambda;

import com.amazonaws.services.lambda.runtime.Context;
import com.amazonaws.services.lambda.runtime.RequestHandler;
import java.util.Map;

public class HelloLambda implements RequestHandler<Map<String, Object>, String> {
    @Override
    public String handleRequest(Map<String, Object> event, Context context) {
        return "OK";
    }
}
受け取るWebhookの設定
管理画面にて、受け取るWebhookを設定できます。設定は以下が用意されています。
- Bounces
- bounced(エラーメールを受け取る)
- Deliveries
- queued(キューに入ったタイミング)
- succeeded(送信完了)
- failed(送信失敗)
- deferred(送信延期)
この中で application/json を指定できます。指定しなかった場合、データは application/x-www-form-urlencoded にて送信されます。本記事ではこの場合を想定しています。

送信されてくるデータについて
メール送信した直後
メール送信を行うと、そのデータがキューに入ります。そして、以下のようなWebhookが送られてきます(データは一部マスキングしています)。データは分かりやすいようにJSONにしていますが、実際には異なりますので注意してください。
{
    "event_type": "deliveries",
    "server_composition": "pro",
    "event": '{"deliveries":[{"reason":"","sourceIp":"100.100.100.1","returnPath":"info@return.pro.smtps.jp","created":"2023-01-25 14:03:06","subject":"メールマガジンのテスト","apiData":"","messageId":"<031a32d4-06cd-b1ae-9526-011c0b9f1296@example.com>","from":"info@example.com","to":"user@example.jp","senderIp":"","status":"queued"}]}'
}
メール送信完了時
Customers Mail Cloudからメール送信処理が行われると、ステータスが succeeded になったWebhookが送られてきます。
{
    "event_type": "deliveries",
    "server_composition": "pro",
    "event": '{"deliveries":[{"reason":"","sourceIp":"","returnPath":"info@return.pro.smtps.jp","created":"2023-01-25 14:03:09","subject":"メールマガジンのテスト","apiData":"","messageId":"<031a32d4-06cd-b1ae-9526-011c0b9f1296@example.com>","from":"info@example.com","to":"user@example.jp","senderIp":"100.100.100.3","status":"succeeded"}]}'
}
メール送信失敗時(メールアドレス形式に問題がある場合)
メールアドレスの形式に問題があるなど、送信処理が失敗した場合には以下のようなWebhookが送られてきます。
{
    "event_type": "bounces",
    "server_composition": "pro",
    "event": '{"bounces":[{"reason":"host unknown","returnPath":"info@return.pro.smtps.jp","created":"2023-01-25 14:05:15","subject":"メールマガジンのテスト","apiData":"","messageId":"<8f902ee7-ae65-8711-48a8-2f708cb14205@example.com>","from":"info@example.com","to":"user@example","status":"1"}]}'
}
メール送信失敗時(送信先サーバーからエラーが返ってくる場合)
ユーザーが存在しない、メールボックスがいっぱいなど送信先サーバーからエラーが返ってきた場合には、以下のようなJSONが返ってきます。
{
    "event_type": "deliveries",
    "server_composition": "pro",
    "event": '{"deliveries":[{"reason":"550 5.1.1 The email account that you tried to reach does not exist. Please try 5.1.1 double-checking the recipient's email address for typos or 5.1.1 unnecessary spaces. Learn more at 5.1.1  <https://support.google.com/mail/?p=NoSuchUser> b197-20020a621bce000000b0058b80756b07si311029pfb.3 - gsmtp (in reply to RCPT TO)","sourceIp":"","returnPath":"info@return.pro.smtps.jp","created":"2023-01-25 14:06:06","subject":"メールマガジンのテスト","apiData":"","messageId":"<9e7e564c-ac83-8cd8-2cb4-b9ff2a9f168d@example.com>","from":"info@example.com","to":"no-user@example.jp","senderIp":"100.100.100.3","status":"failed"}]}'
}
エラーとしてのWebhookも送られてきます。上記のものと event_type が異なるので注意してください。
{
    "event_type": "bounces",
    "server_composition": "pro",
    "event": '{"bounces":[{"reason":"550 5.1.1 The email account that you tried to reach does not exist. Please try 5.1.1 double-checking the recipient's email address for typos or 5.1.1 unnecessary spaces. Learn more at 5.1.1  <https://support.google.com/mail/?p=NoSuchUser> b197-20020a621bce000000b0058b80756b07si311029pfb.3 - gsmtp (in reply to RCPT TO)","returnPath":"info@return.pro.smtps.jp","created":"2023-01-25 14:06:07","subject":"メールマガジンのテスト","apiData":"","messageId":"<9e7e564c-ac83-8cd8-2cb4-b9ff2a9f168d@example.com>","from":"info@example.com","to":"no-user@example.jp","status":"2"}]}'
}
Javaのコード
処理は src/main/java/com/example/lambda/HelloLambda.java に記述します。
package com.example.lambda;

import com.amazonaws.services.lambda.runtime.Context;
import com.amazonaws.services.lambda.runtime.RequestHandler;
import java.util.Map;

public class HelloLambda implements RequestHandler<Map<String, Object>, String> {
    @Override
    public String handleRequest(Map<String, Object> event, Context context) {
        return "OK";
    }
}
また、データの入力を格納するクラスを用意します。 src/main/java/com/example/lambda/Input.java に記述します。クラスのプロパティはCustomers Mail Cloudのドキュメントを参考にしています。
package com.example.lambda;

import com.fasterxml.jackson.annotation.JsonIgnoreProperties;
import com.fasterxml.jackson.annotation.JsonProperty;
import java.util.List;

@JsonIgnoreProperties(ignoreUnknown = true)
public class Input {
    public String eventType;

    public String serverComposition;

    public Event event;

    public static class Event {
        public List<MessageEvent> deliveries;
        public List<MessageEvent> bounces;
    }

    public static class MessageEvent {
        public String reason;
        public String sourceIp;
        public String returnPath;
        public String created;
        public String subject;
        public String apiData;
        public String messageId;
        public String from;
        public String to;
        public String senderIp;
        public String status;
    }
}
全体の流れ
処理の流れは以下の通りです。
- Base64エンコードされたボディをデコード
- URLエンコードされたフォームデータをパース
- 単純なフィールドを直接取得
- JSONフィールドはJacksonでオブジェクト化
- ログ出力
Base64エンコードされたボディをデコード
API Gateway を通じて Lambda に渡される時、body はBase64エンコードされています。そのため、まずはデコードして元の文字列に戻します。
// リクエストボディ(Base64エンコードされた文字列)を取得
String encodedBody = (String) event.get("body");

// Base64デコードしてバイト配列に戻す
byte[] decodedBytes = Base64.getDecoder().decode(encodedBody);

// バイト配列をUTF-8文字列に変換
String formBody = new String(decodedBytes, StandardCharsets.UTF_8);
URLエンコードされたフォームデータをパース
次に、URLエンコードされたフォームデータをパースします。Javaでは java.net.URLDecoder を使ってデコードできます。
// フォームデータを key-value 形式に変換(例:event_type=xxx&event=yyy)
Map<String, String> formMap = parseForm(formBody);
parseForm メソッドは以下のように実装します。この関数では、URLエンコードされた文字列を & で分割し、各部分を = で分けてMapに格納します。
// URLエンコードされたフォームデータを key-value 形式のMapに変換するメソッド
private Map<String, String> parseForm(String body) {
    Map<String, String> map = new HashMap<>();

    // フォームデータは "key1=value1&key2=value2" という形式
    // & で分割し、1つずつ key=value に分解する
    for (String pair : body.split("&")) {
        String[] parts = pair.split("=", 2);

        // key をデコード(URLエンコードされている可能性があるため)
        String key = URLDecoder.decode(parts[0], StandardCharsets.UTF_8);

        // value もデコード、値がない場合は空文字を入れる
        String value = parts.length > 1 ? URLDecoder.decode(parts[1], StandardCharsets.UTF_8) : "";

        // key と value をMapに格納
        map.put(key, value);
    }

    // 完成したMapを返す
    return map;
}
単純なフィールドを直接取得
次に、単純なフィールド( event_type や server_composition )は直接取得して、Javaオブジェクトに格納します。 event フィールドはJSON形式なので、Jacksonを使ってJavaオブジェクトに変換します。
// JSONをJavaオブジェクトに変換するためのツールを準備
ObjectMapper mapper = new ObjectMapper();

// 入力データを格納するクラスのインスタンスを作成
Input input = new Input();

// フォームデータから event_type を取得して設定
input.eventType = formMap.get("event_type");

// フォームデータから server_composition を取得して設定
input.serverComposition = formMap.get("server_composition");

// event フィールドは JSON 形式なので、Javaオブジェクトに変換して格納
String eventJson = formMap.get("event");
if (eventJson != null) {
    input.event = mapper.readValue(eventJson, Input.Event.class);
}
ログ出力
今回は、最後にデバッグ用にログ出力を行います。 System.out.println を使って、各フィールドの値を表示します。
// デバッグ用にパースした結果を出力
System.out.println("Parsed input:");
System.out.println("event_type: " + input.eventType);
System.out.println("server_composition: " + input.serverComposition);

// event の中に deliveries(配信情報)があれば1件ずつ出力
if (input.event != null && input.event.deliveries != null) {
    for (Input.MessageEvent msg : input.event.deliveries) {
        System.out.println("Delivery: " + msg.subject + " → " + msg.to + " [" + msg.status + "]");
    }
}
出力例は以下の通りです。
Parsed input:
event_type: deliveries
server_composition: pro
Delivery: メールマガジンのテスト → user@smtps.jp [queued]
全体のコード
// HelloLambda.java
package com.example.lambda;

import com.amazonaws.services.lambda.runtime.Context;
import com.amazonaws.services.lambda.runtime.RequestHandler;

import java.util.Base64;
import java.util.HashMap;
import java.util.Map;
import java.net.URLDecoder;
import java.io.UnsupportedEncodingException;
import java.nio.charset.StandardCharsets;
import com.fasterxml.jackson.databind.ObjectMapper;
public class HelloLambda implements RequestHandler<Map<String, Object>, String> {

    @Override
    public String handleRequest(Map<String, Object> event, Context context) {
        try {
            String encodedBody = (String) event.get("body");
            byte[] decodedBytes = Base64.getDecoder().decode(encodedBody);
            String formBody = new String(decodedBytes, StandardCharsets.UTF_8);

            // フォームを key-value にパース
            Map<String, String> formMap = parseForm(formBody);

            ObjectMapper mapper = new ObjectMapper();
            Input input = new Input();

            // 単純フィールドを直接マッピング
            input.eventType = formMap.get("event_type");
            input.serverComposition = formMap.get("server_composition");

            // event フィールドだけ JSONとしてパース
            String eventJson = formMap.get("event");
            if (eventJson != null) {
                input.event = mapper.readValue(eventJson, Input.Event.class);
            }

            // デバッグ出力
            System.out.println("Parsed input:");
            System.out.println("event_type: " + input.eventType);
            System.out.println("server_composition: " + input.serverComposition);
            if (input.event != null && input.event.deliveries != null) {
                for (Input.MessageEvent msg : input.event.deliveries) {
                    System.out.println("Delivery: " + msg.subject + " → " + msg.to + " [" + msg.status + "]");
                }
            }

            return "OK";
        } catch (Exception e) {
            e.printStackTrace();
            return "ERROR";
        }
    }

    private Map<String, String> parseForm(String body) {
        Map<String, String> map = new HashMap<>();
        for (String pair : body.split("&")) {
            String[] parts = pair.split("=", 2);
            String key = URLDecoder.decode(parts[0], StandardCharsets.UTF_8);
            String value = parts.length > 1 ? URLDecoder.decode(parts[1], StandardCharsets.UTF_8) : "";
            map.put(key, value);
        }
        return map;
    }
}

// Input.java
package com.example.lambda;

import com.fasterxml.jackson.annotation.JsonIgnoreProperties;
import com.fasterxml.jackson.annotation.JsonProperty;
import java.util.List;

@JsonIgnoreProperties(ignoreUnknown = true)
public class Input {
    public String eventType;

    public String serverComposition;

    public Event event;

    public static class Event {
        public List<MessageEvent> deliveries;
        public List<MessageEvent> bounces;
    }

    public static class MessageEvent {
        public String reason;
        public String sourceIp;
        public String returnPath;
        public String created;
        public String subject;
        public String apiData;
        public String messageId;
        public String from;
        public String to;
        public String senderIp;
        public String status;
    }
}
まとめ
Webhookを使うことで、メール送信ステータスの変化に応じて通知を受け取れるようになります。メールと連携したシステムを開発する際に役立つでしょう。
AWS Lambdaの場合は application/json を指定した方が全体として、受け取りやすい印象です。ぜひお試しください。なお、このWebhookはSMTP経由の場合、利用できます。
