Customers Mail CloudのWebhookは2種類あります。
- メール受信時
- メール送信時
メール送信時は、送信したメールに対してステータスが変わったタイミングで通知が送られるものです。
その際、 application/json を指定しない設定ができます。この時のデータがどうなっているのか紹介します。
<!—more—>
AWS Lambdaの準備
AWS Lambdaで新しい関数を作成します。その際、条件として以下を指定します。
- ランタイム
Python 3.13 - 関数 URL を有効化
チェックを入れる - 認証タイプ
NONE
関数の作成が完了したら、関数コードを編集します。ベースになるコードは以下の通りです。
import json

def lambda_handler(event, context):
    return {
        'statusCode': 200,
        'body': json.dumps('ok')
    }
Pythonのコード
処理は lambda_function.py に記述します。
import json

def lambda_handler(event, context):
    return {
        'statusCode': 200,
        'body': json.dumps('ok')
    }
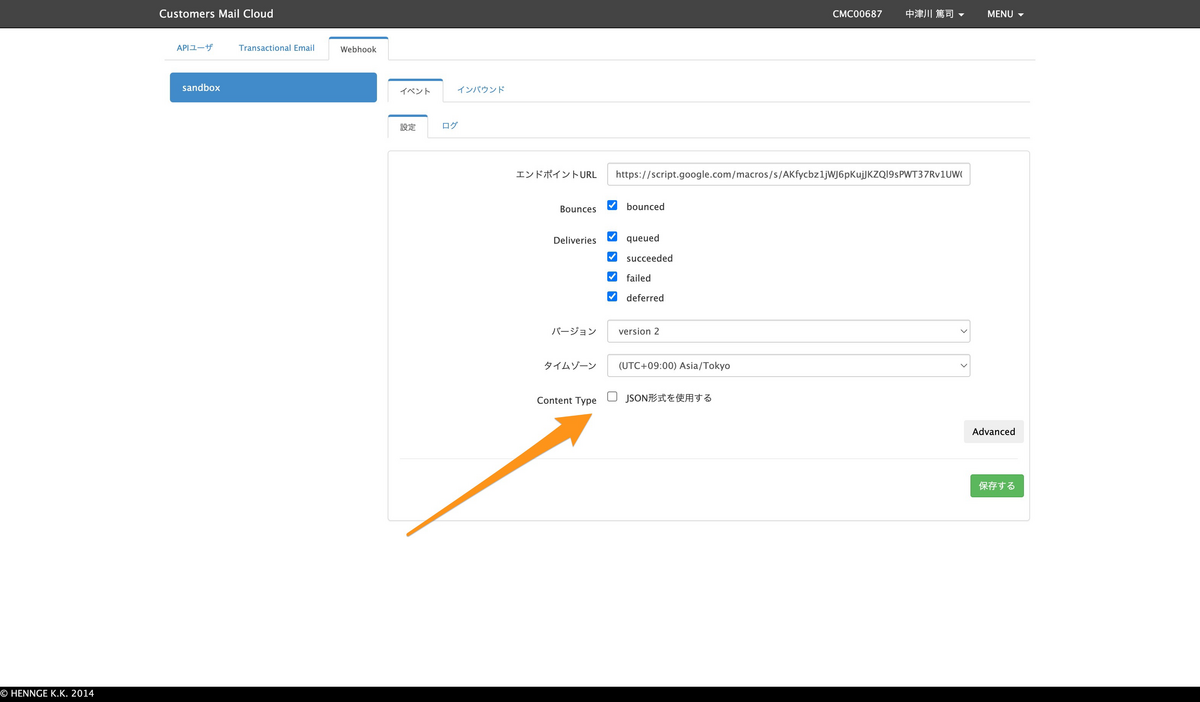
受け取るWebhookの設定
管理画面にて、受け取るWebhookを設定できます。設定は以下が用意されています。
- Bounces
- bounced(エラーメールを受け取る)
- Deliveries
- queued(キューに入ったタイミング)
- succeeded(送信完了)
- failed(送信失敗)
- deferred(送信延期)
この中で application/json を指定できます。指定しなかった場合、データは application/x-www-form-urlencoded にて送信されます。本記事ではこの場合を想定しています。
送信されてくるデータについて
メール送信した直後
メール送信を行うと、そのデータがキューに入ります。そして、以下のようなWebhookが送られてきます(データは一部マスキングしています)。データは分かりやすいようにJSONにしていますが、実際には異なりますので注意してください。
{
    "event_type": "deliveries",
    "server_composition": "pro",
    "event": '{"deliveries":[{"reason":"","sourceIp":"100.100.100.1","returnPath":"info@return.pro.smtps.jp","created":"2023-01-25 14:03:06","subject":"メールマガジンのテスト","apiData":"","messageId":"<031a32d4-06cd-b1ae-9526-011c0b9f1296@example.com>","from":"info@example.com","to":"user@example.jp","senderIp":"","status":"queued"}]}'
}
メール送信完了時
Customers Mail Cloudからメール送信処理が行われると、ステータスが succeeded になったWebhookが送られてきます。
{
    "event_type": "deliveries",
    "server_composition": "pro",
    "event": '{"deliveries":[{"reason":"","sourceIp":"","returnPath":"info@return.pro.smtps.jp","created":"2023-01-25 14:03:09","subject":"メールマガジンのテスト","apiData":"","messageId":"<031a32d4-06cd-b1ae-9526-011c0b9f1296@example.com>","from":"info@example.com","to":"user@example.jp","senderIp":"100.100.100.3","status":"succeeded"}]}'
}
メール送信失敗時(メールアドレス形式に問題がある場合)
メールアドレスの形式に問題があるなど、送信処理が失敗した場合には以下のようなWebhookが送られてきます。
{
    "event_type": "bounces",
    "server_composition": "pro",
    "event": '{"bounces":[{"reason":"host unknown","returnPath":"info@return.pro.smtps.jp","created":"2023-01-25 14:05:15","subject":"メールマガジンのテスト","apiData":"","messageId":"<8f902ee7-ae65-8711-48a8-2f708cb14205@example.com>","from":"info@example.com","to":"user@example","status":"1"}]}'
}
メール送信失敗時(送信先サーバーからエラーが返ってくる場合)
ユーザーが存在しない、メールボックスがいっぱいなど送信先サーバーからエラーが返ってきた場合には、以下のようなJSONが返ってきます。
{
    "event_type": "deliveries",
    "server_composition": "pro",
    "event": '{"deliveries":[{"reason":"550 5.1.1 The email account that you tried to reach does not exist. Please try 5.1.1 double-checking the recipient's email address for typos or 5.1.1 unnecessary spaces. Learn more at 5.1.1  <https://support.google.com/mail/?p=NoSuchUser> b197-20020a621bce000000b0058b80756b07si311029pfb.3 - gsmtp (in reply to RCPT TO)","sourceIp":"","returnPath":"info@return.pro.smtps.jp","created":"2023-01-25 14:06:06","subject":"メールマガジンのテスト","apiData":"","messageId":"<9e7e564c-ac83-8cd8-2cb4-b9ff2a9f168d@example.com>","from":"info@example.com","to":"no-user@example.jp","senderIp":"100.100.100.3","status":"failed"}]}'
}
エラーとしてのWebhookも送られてきます。上記のものと event_type が異なるので注意してください。
{
    "event_type": "bounces",
    "server_composition": "pro",
    "event": '{"bounces":[{"reason":"550 5.1.1 The email account that you tried to reach does not exist. Please try 5.1.1 double-checking the recipient's email address for typos or 5.1.1 unnecessary spaces. Learn more at 5.1.1  <https://support.google.com/mail/?p=NoSuchUser> b197-20020a621bce000000b0058b80756b07si311029pfb.3 - gsmtp (in reply to RCPT TO)","returnPath":"info@return.pro.smtps.jp","created":"2023-01-25 14:06:07","subject":"メールマガジンのテスト","apiData":"","messageId":"<9e7e564c-ac83-8cd8-2cb4-b9ff2a9f168d@example.com>","from":"info@example.com","to":"no-user@example.jp","status":"2"}]}'
}
Pythonのコード
処理は lambda_function.py に記述します。
import json

def lambda_handler(event, context):
    return {
        'statusCode': 200,
        'body': json.dumps('ok')
    }
データをデコードする
送られてきたデータはBase64エンコードされているので、デコードします。
# リクエストボディの取得
encoded_str = event.get('body', '')
decoded_bytes = base64.b64decode(encoded_str)
# デコードしたバイト列を文字列に変換(UTF-8 エンコーディングを仮定)
decoded_str = decoded_bytes.decode('utf-8')

# クエリ文字列を解析
params = urllib.parse.parse_qs(decoded_str)
この内容は、値が常に配列となっている点に注意してデータを取得します。
event_type = params.get('event_type', [''])[0]
print(event_type) # deliveries
また、 event の中にはJSON文字列が入っているので、さらに json.loads でオブジェクトに変換します。
event = json.loads(params.get('event', [''])[0])
message = event.get(event_type, [''])[0]

print(event_type)
print(message.get('subject', ''))
そして、処理した結果は body に入ります。データには body.fields[フィールド名] でアクセスできますが、 event キー以下は文字列になっています。そのため、追加で JSON.parse を行って、オブジェクトにします。これで event 内にあるデータに対してアクセスできます。
const eventType = body.fields.event_type;
const event = JSON.parse(body.fields.event);
console.log(event[eventType][0].subject); // メールマガジンのテスト
まとめ
Webhookを使うことで、メール送信ステータスの変化に応じて通知を受け取れるようになります。メールと連携したシステムを開発する際に役立つでしょう。
AWS Lambdaの場合は application/json を指定した方が全体として、受け取りやすい印象です。ぜひお試しください。なお、このWebhookはSMTP経由の場合、利用できます。