Customers Mail CloudのWebhookは2種類あります。
- メール受信時
- メール送信時
メール送信時は、送信したメールに対してステータスが変わったタイミングで通知が送られるものです。
本記事では実際にどういった内容が送られてくるのかを紹介します。
GCPの準備
まずGCPにてプロジェクトを作成します。このプロジェクトは課金設定されている必要があります。
以下5つのAPIを有効にします。
- Cloud Functions
- Cloud Build
- Artifact Registry
- Cloud Run
- Cloud Logging API
gcloud CLIをインストールします。各OS別にダウンロードするバイナリが異なるので注意してください。
ファイルを伸張したら、installコマンドを実行します。
$ /path/to/google-cloud-sdk/install.sh
インストールすると gcloud コマンドが使えるようになります。続けてコンポーネントをアップデートします。
$ gcloud components update
関数を作成する
まずCloud Functionsにアップロードする関数を作ります。適当なディレクトリを作成し、その中に移動します。
$ mkdir cmc
$ cd cmc
そしてGoファイルを作成します。今回は webhook.go としています。
package helloworld

import (
    "encoding/json"
    "fmt"
    "strconv"
    "html"
    "net/http"
    "github.com/GoogleCloudPlatform/functions-framework-go/functions"
)

func init() {
  functions.HTTP("HelloHTTP", HelloHTTP)
}

func HelloHTTP(w http.ResponseWriter, r *http.Request) {
    // この中にコードを書きます

    // 最後にdoneと出力しておく
    fmt.Fprint(w, "done")
}
依存関係を解決するため、 go.mod を作成します。
$ go mod init example.com/hello
$ go mod tidy
関数をローカルでテスト実行する
開発中はローカルで実行してテストするので、そのための準備をします。
$ mkdir cmd
$ cd cmd
cmdディレクトリの中に main.go を作成します。
package main

import (
  "log"
  "os"

  // Blank-import the function package so the init() runs
  _ "example.com/hello"
  "github.com/GoogleCloudPlatform/functions-framework-go/funcframework"
)

func main() {
  // Use PORT environment variable, or default to 8080.
  port := "8080"
  if envPort := os.Getenv("PORT"); envPort != "" {
    port = envPort
  }
  if err := funcframework.Start(port); err != nil {
    log.Fatalf("funcframework.Start: %v\n", err)
  }
}
先ほどと同じく cmd の中でも依存関係を解決します。
$ go mod tidy
後は main.go を実行してHTTPサーバーを立ち上げます。
$ export FUNCTION_TARGET=HelloHTTP
$ go run /path/to/cmd/main.go
これで http://localhost:8080 で関数を呼び出せます。
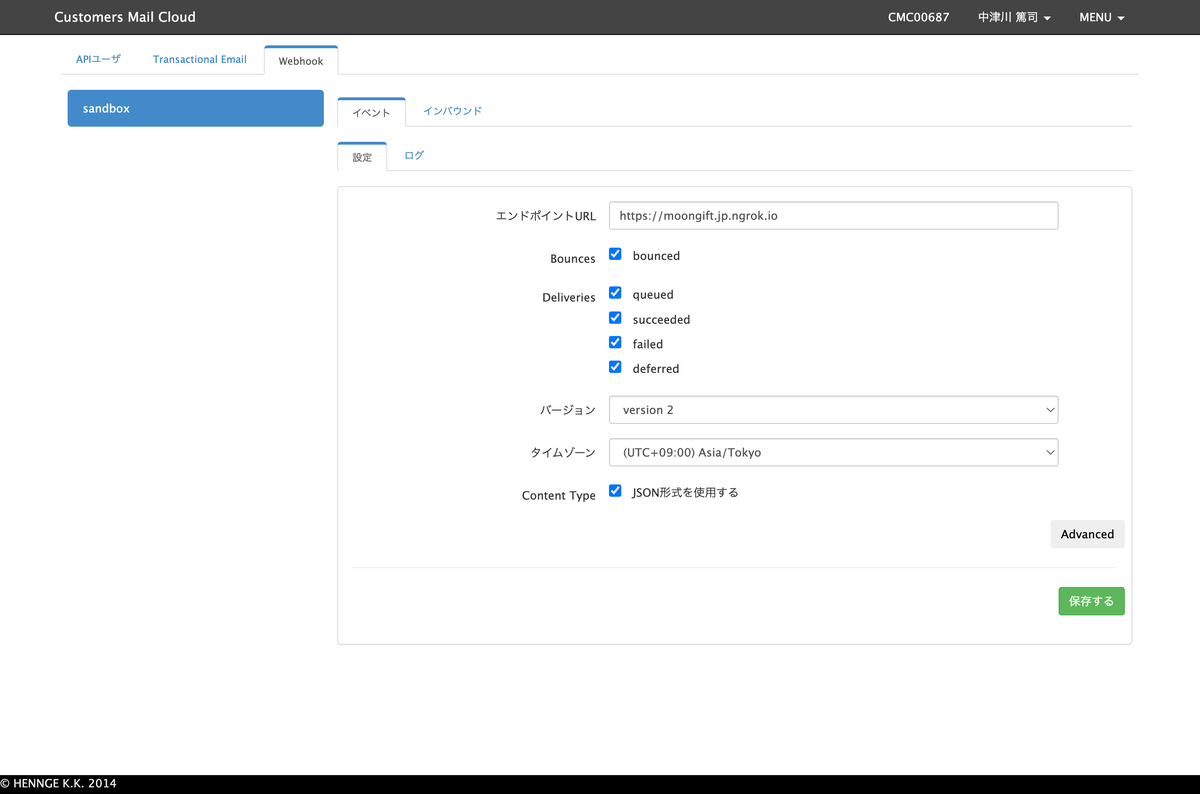
受け取るWebhookの設定
管理画面にて、受け取るWebhookを設定できます。設定は以下が用意されています。
- Bounces
- bounced(エラーメールを受け取る)
- Deliveries
- queued(キューに入ったタイミング)
- succeeded(送信完了)
- failed(送信失敗)
- deferred(送信延期)
送信されてくるデータについて
メール送信した直後
メール送信を行うと、そのデータがキューに入ります。そして、以下のようなWebhookが送られてきます(データは一部マスキングしています)。
{
    "event_type": "deliveries",
    "server_composition": "pro",
    "event": {
        "deliveries": [
            {
                "reason": "",
                "sourceIp": "100.100.100.1",
                "returnPath": "info@return.pro.smtps.jp",
                "created": "2023-01-25 14:03:06",
                "subject": "メールマガジンのテスト",
                "apiData": "",
                "messageId": "<031a32d4-06cd-b1ae-9526-011c0b9f1296@example.com>",
                "from": "info@example.com",
                "to": "user@example.jp",
                "senderIp": "",
                "status": "queued"
            }
        ]
    }
}
メール送信完了時
Customers Mail Cloudからメール送信処理が行われると、ステータスが succeeded になったWebhookが送られてきます。
{
    "event_type": "deliveries",
    "server_composition": "pro",
    "event": {
        "deliveries": [
            {
                "reason": "",
                "sourceIp": "",
                "returnPath": "info@return.pro.smtps.jp",
                "created": "2023-01-25 14:03:09",
                "subject": "メールマガジンのテスト",
                "apiData": "",
                "messageId": "<031a32d4-06cd-b1ae-9526-011c0b9f1296@example.com>",
                "from": "info@example.com",
                "to": "user@example.jp",
                "senderIp": "100.100.100.3",
                "status": "succeeded"
            }
        ]
    }
}
メール送信失敗時(メールアドレス形式に問題がある場合)
メールアドレスの形式に問題があるなど、送信処理が失敗した場合には以下のようなWebhookが送られてきます。
{
    "event_type": "bounces",
    "server_composition": "pro",
    "event": {
        "bounces": [
            {
                "reason": "host unknown",
                "returnPath": "info@return.pro.smtps.jp",
                "created": "2023-01-25 14:05:15",
                "subject": "メールマガジンのテスト",
                "apiData": "",
                "messageId": "<8f902ee7-ae65-8711-48a8-2f708cb14205@example.com>",
                "from": "info@example.com",
                "to": "user@example",
                "status": "1"
            }
        ]
    }
}
メール送信失敗時(送信先サーバーからエラーが返ってくる場合)
ユーザーが存在しない、メールボックスがいっぱいなど送信先サーバーからエラーが返ってきた場合には、以下のようなJSONが返ってきます。
{
    "event_type": "deliveries",
    "server_composition": "pro",
    "event": {
        "deliveries": [
            {
                "reason": "550 5.1.1 The email account that you tried to reach does not exist. Please try 5.1.1 double-checking the recipient's email address for typos or 5.1.1 unnecessary spaces. Learn more at 5.1.1  <https://support.google.com/mail/?p=NoSuchUser> b197-20020a621bce000000b0058b80756b07si311029pfb.3 - gsmtp (in reply to RCPT TO)",
                "sourceIp": "",
                "returnPath": "info@return.pro.smtps.jp",
                "created": "2023-01-25 14:06:06",
                "subject": "メールマガジンのテスト",
                "apiData": "",
                "messageId": "<9e7e564c-ac83-8cd8-2cb4-b9ff2a9f168d@example.com>",
                "from": "info@example.com",
                "to": "no-user@example.jp",
                "senderIp": "100.100.100.3",
                "status": "failed"
            }
        ]
    }
}
エラーとしてのWebhookも送られてきます。上記のものと event_type が異なるので注意してください。
{
    "event_type": "bounces",
    "server_composition": "pro",
    "event": {
        "bounces": [
            {
                "reason": "550 5.1.1 The email account that you tried to reach does not exist. Please try 5.1.1 double-checking the recipient's email address for typos or 5.1.1 unnecessary spaces. Learn more at 5.1.1  <https://support.google.com/mail/?p=NoSuchUser> b197-20020a621bce000000b0058b80756b07si311029pfb.3 - gsmtp (in reply to RCPT TO)",
                "returnPath": "info@return.pro.smtps.jp",
                "created": "2023-01-25 14:06:07",
                "subject": "メールマガジンのテスト",
                "apiData": "",
                "messageId": "<9e7e564c-ac83-8cd8-2cb4-b9ff2a9f168d@example.com>",
                "from": "info@example.com",
                "to": "no-user@example.jp",
                "status": "2"
            }
        ]
    }
}
Goのコード
構造体の作成
上記JSONに合わせて構造体を作成します。
type Mail struct {
    EventType         string `json:"event_type"`
    ServerComposition string `json:"server_composition"`
    Event             struct {
        Bounces    []MailInfo `json:"bounces"`
        Deliveries []MailInfo `json:"deliveries"`
    } `json:"event"`
}

type MailInfo struct {
    Reason     string `json:"reason"`
    ReturnPath string `json:"returnPath"`
    Created    string `json:"created"`
    Subject    string `json:"subject"`
    ApiData    string `json:"apiData"`
    MessageId  string `json:"messageId"`
    From       string `json:"from"`
    To         string `json:"to"`
    Status     string `json:"status"`
    SourceIp   string `json:"sourceIp"`
    SenderIp   string `json:"senderIp"`
}
データを受け取った際の処理について
今回は簡単な処理を書いてみます。 json.NewDecoder を使ってJSONデータを構造体に変換しています。
func HelloHTTP(w http.ResponseWriter, r *http.Request) {
    var mail Mail
    if err := json.NewDecoder(r.Body).Decode(&mail); err != nil {
        http.Error(w, err.Error(), http.StatusBadRequest)
        return
    }
    fmt.Println(mail.EventType)
    deliveries := mail.Event.Deliveries
    if deliveries != nil {
        fmt.Println(deliveries[0].SourceIp)
    }
    fmt.Fprint(w, "done")
}
まとめ
Webhookを使うことで、メール送信ステータスの変化に応じて通知を受け取れるようになります。メールと連携したシステムを開発する際に役立つでしょう。
このWebhookはSMTP経由の場合、利用できます。ぜひご利用ください。