Customers Mail CloudのWebhookは2種類あります。
- メール受信時
- メール送信時
メール送信時は、送信したメールに対してステータスが変わったタイミングで通知が送られるものです。
本記事では実際にどういった内容が送られてくるのかを紹介します。
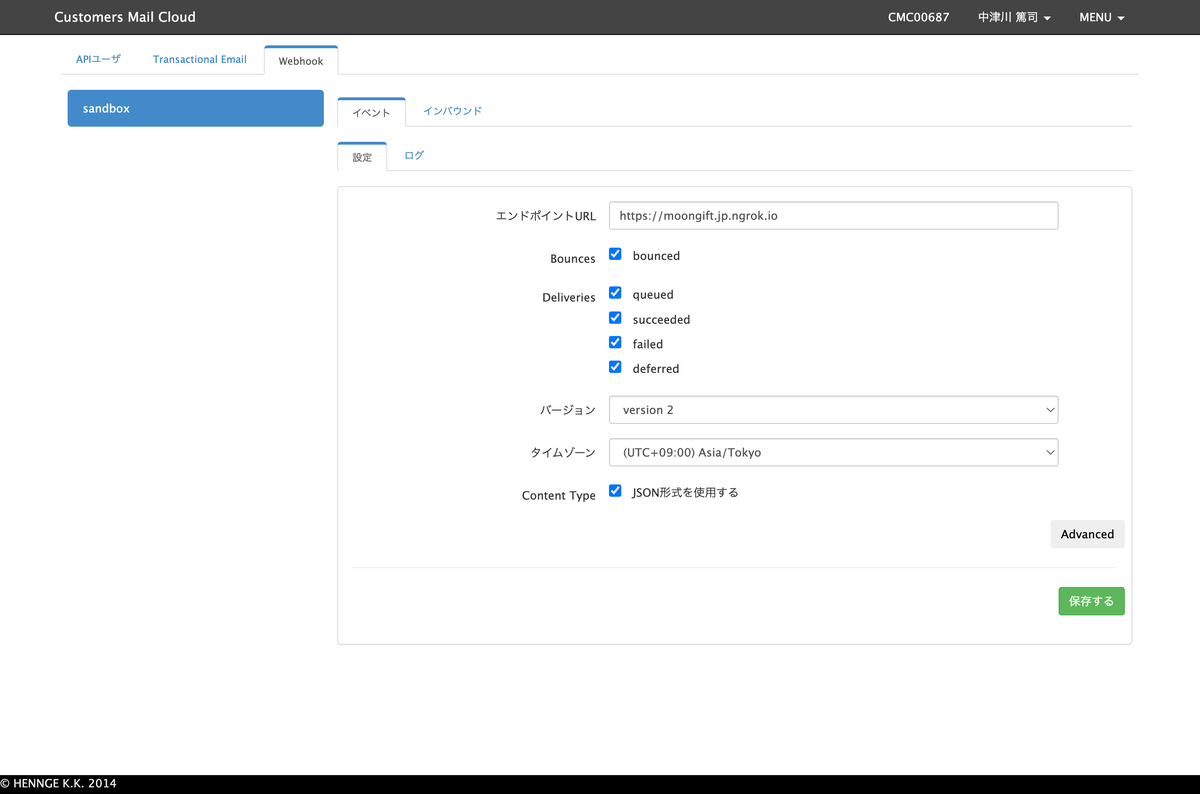
受け取るWebhookの設定
管理画面にて、受け取るWebhookを設定できます。設定は以下が用意されています。
- Bounces
- bounced(エラーメールを受け取る)
- Deliveries
- queued(キューに入ったタイミング)
- succeeded(送信完了)
- failed(送信失敗)
- deferred(送信延期)
送信されてくるデータについて
メール送信した直後
メール送信を行うと、そのデータがキューに入ります。そして、以下のようなWebhookが送られてきます(データは一部マスキングしています)。
{
    "event_type": "deliveries",
    "server_composition": "pro",
    "event": {
        "deliveries": [
            {
                "reason": "",
                "sourceIp": "100.100.100.1",
                "returnPath": "info@return.pro.smtps.jp",
                "created": "2023-01-25 14:03:06",
                "subject": "メールマガジンのテスト",
                "apiData": "",
                "messageId": "<031a32d4-06cd-b1ae-9526-011c0b9f1296@example.com>",
                "from": "info@example.com",
                "to": "user@example.jp",
                "senderIp": "",
                "status": "queued"
            }
        ]
    }
}
メール送信完了時
Customers Mail Cloudからメール送信処理が行われると、ステータスが succeeded になったWebhookが送られてきます。
{
    "event_type": "deliveries",
    "server_composition": "pro",
    "event": {
        "deliveries": [
            {
                "reason": "",
                "sourceIp": "",
                "returnPath": "info@return.pro.smtps.jp",
                "created": "2023-01-25 14:03:09",
                "subject": "メールマガジンのテスト",
                "apiData": "",
                "messageId": "<031a32d4-06cd-b1ae-9526-011c0b9f1296@example.com>",
                "from": "info@example.com",
                "to": "user@example.jp",
                "senderIp": "100.100.100.3",
                "status": "succeeded"
            }
        ]
    }
}
メール送信失敗時(メールアドレス形式に問題がある場合)
メールアドレスの形式に問題があるなど、送信処理が失敗した場合には以下のようなWebhookが送られてきます。
{
    "event_type": "bounces",
    "server_composition": "pro",
    "event": {
        "bounces": [
            {
                "reason": "host unknown",
                "returnPath": "info@return.pro.smtps.jp",
                "created": "2023-01-25 14:05:15",
                "subject": "メールマガジンのテスト",
                "apiData": "",
                "messageId": "<8f902ee7-ae65-8711-48a8-2f708cb14205@example.com>",
                "from": "info@example.com",
                "to": "user@example",
                "status": "1"
            }
        ]
    }
}
メール送信失敗時(送信先サーバーからエラーが返ってくる場合)
ユーザーが存在しない、メールボックスがいっぱいなど送信先サーバーからエラーが返ってきた場合には、以下のようなJSONが返ってきます。
{
    "event_type": "deliveries",
    "server_composition": "pro",
    "event": {
        "deliveries": [
            {
                "reason": "550 5.1.1 The email account that you tried to reach does not exist. Please try 5.1.1 double-checking the recipient's email address for typos or 5.1.1 unnecessary spaces. Learn more at 5.1.1  <https://support.google.com/mail/?p=NoSuchUser> b197-20020a621bce000000b0058b80756b07si311029pfb.3 - gsmtp (in reply to RCPT TO)",
                "sourceIp": "",
                "returnPath": "info@return.pro.smtps.jp",
                "created": "2023-01-25 14:06:06",
                "subject": "メールマガジンのテスト",
                "apiData": "",
                "messageId": "<9e7e564c-ac83-8cd8-2cb4-b9ff2a9f168d@example.com>",
                "from": "info@example.com",
                "to": "no-user@example.jp",
                "senderIp": "100.100.100.3",
                "status": "failed"
            }
        ]
    }
}
エラーとしてのWebhookも送られてきます。上記のものと event_type が異なるので注意してください。
{
    "event_type": "bounces",
    "server_composition": "pro",
    "event": {
        "bounces": [
            {
                "reason": "550 5.1.1 The email account that you tried to reach does not exist. Please try 5.1.1 double-checking the recipient's email address for typos or 5.1.1 unnecessary spaces. Learn more at 5.1.1  <https://support.google.com/mail/?p=NoSuchUser> b197-20020a621bce000000b0058b80756b07si311029pfb.3 - gsmtp (in reply to RCPT TO)",
                "returnPath": "info@return.pro.smtps.jp",
                "created": "2023-01-25 14:06:07",
                "subject": "メールマガジンのテスト",
                "apiData": "",
                "messageId": "<9e7e564c-ac83-8cd8-2cb4-b9ff2a9f168d@example.com>",
                "from": "info@example.com",
                "to": "no-user@example.jp",
                "status": "2"
            }
        ]
    }
}
Google Cloud Functionsの準備
今回はローカルで開発する流れを紹介します。まずindex.phpというファイルを作成し、内容を以下のように記述します。
<?php

use Google\CloudFunctions\FunctionsFramework;
use Psr\Http\Message\ServerRequestInterface;

// Register the function with Functions Framework.
// This enables omitting the `FUNCTIONS_SIGNATURE_TYPE=http` environment
// variable when deploying. The `FUNCTION_TARGET` environment variable should
// match the first parameter.
FunctionsFramework::http('helloHttp', 'helloHttp');

function helloHttp(ServerRequestInterface $request): string
{
    $name = 'World';
    $body = $request->getBody()->getContents();
    if (!empty($body)) {
        $json = json_decode($body, true);
        if (json_last_error() != JSON_ERROR_NONE) {
            throw new RuntimeException(sprintf(
                'Could not parse body: %s',
                json_last_error_msg()
            ));
        }
        $name = $json['name'] ?? $name;
    }
    $queryString = $request->getQueryParams();
    $name = $queryString['name'] ?? $name;

    return sprintf('Hello, %s!', htmlspecialchars($name));
}
次に、 composer.json というファイルを作成し、以下のように記述します。これは composer を使っていますので、あらかじめComposerのインストールを行ってください。
{
    "require": {
        "php": ">= 7.4",
        "google/cloud-functions-framework": "^1.1"
    },
    "scripts": {
        "start": [
           "Composer\\Config::disableProcessTimeout",
           "FUNCTION_TARGET=helloHttp php -S localhost:${PORT:-8080} vendor/google/cloud-functions-framework/router.php"
        ]
    }
}
ファイルを作成したら、 composer コマンドでインストールします。
composer require google/cloud-functions-framework
これで準備は完了です。関数は以下のように実行します。
export FUNCTION_TARGET=helloHttp composer start
実行すると、 http://127.0.0.1:8080 でサーバーが立ち上がります。
PHPのコード
処理は index.php の helloHttp 関数内に記述します。最低限として、200番台のステータスコードを返す必要があります。
function helloHttp(ServerRequestInterface $request): string
{
    // ここに処理を記述
    return printf('ok');
}
送られてくるデータは $request->getBody()->getContents() で受け取れます。この内容はJSON文字列なので、 json_decode を使って連想配列に変換します。
$body = $request->getBody()->getContents();
$json = json_decode($body, true);
$json には送られてきたデータが連想配列として入っています。後はキーを指定してデータを取り出すだけです。
printf($json['event_type']); // deliveries
printf($json['event'][$json['event_type']][0]['subject']); // メールマガジンのテスト
まとめ
Webhookを使うことで、メール送信ステータスの変化に応じて通知を受け取れるようになります。メールと連携したシステムを開発する際に役立つでしょう。
このWebhookはSMTP経由の場合、利用できます。ぜひご利用ください。