Customers Mail CloudのWebhookは2種類あります。
- メール受信時
- メール送信時
メール送信時は、送信したメールに対してステータスが変わったタイミングで通知が送られるものです。
本記事では実際にどういった内容が送られてくるのかを紹介します。
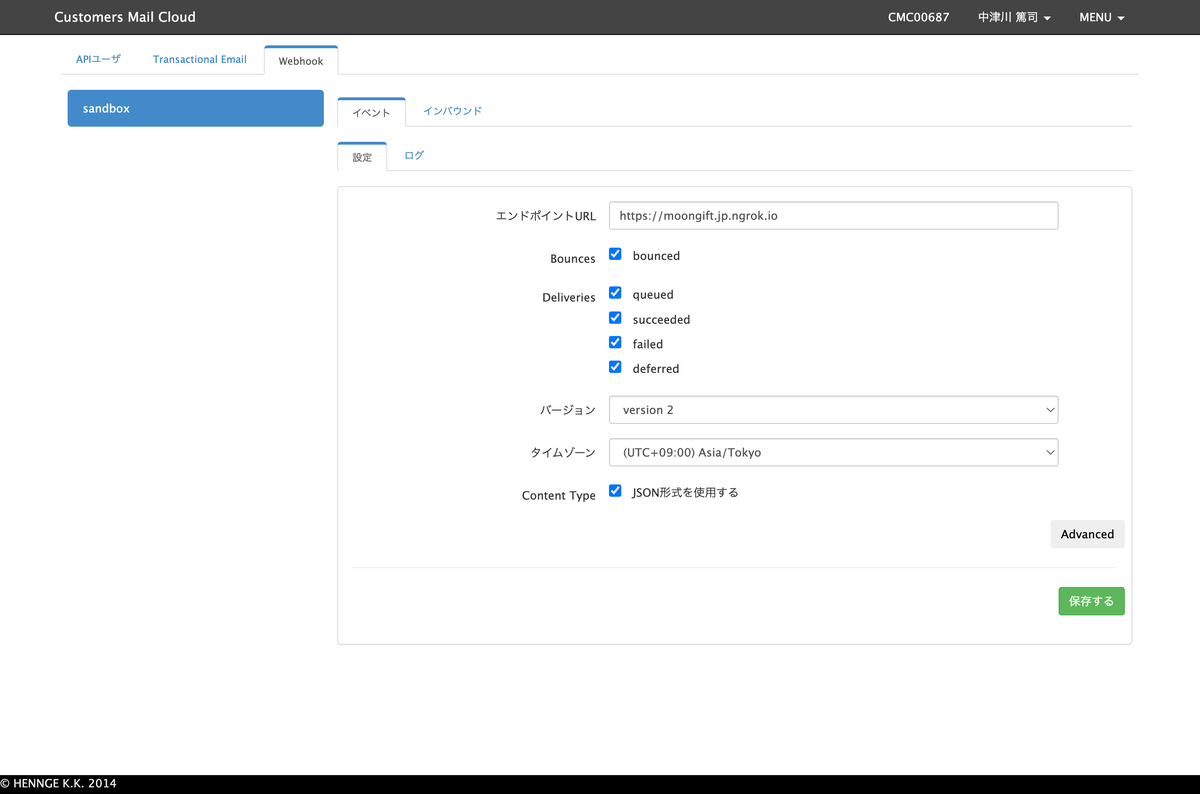
受け取るWebhookの設定
管理画面にて、受け取るWebhookを設定できます。設定は以下が用意されています。
- Bounces
- bounced(エラーメールを受け取る)
- Deliveries
- queued(キューに入ったタイミング)
- succeeded(送信完了)
- failed(送信失敗)
- deferred(送信延期)

送信されてくるデータについて
メール送信した直後
メール送信を行うと、そのデータがキューに入ります。そして、以下のようなWebhookが送られてきます(データは一部マスキングしています)。
{
    "event_type": "deliveries",
    "server_composition": "pro",
    "event": {
        "deliveries": [
            {
                "reason": "",
                "sourceIp": "100.100.100.1",
                "returnPath": "info@return.pro.smtps.jp",
                "created": "2023-01-25 14:03:06",
                "subject": "メールマガジンのテスト",
                "apiData": "",
                "messageId": "<031a32d4-06cd-b1ae-9526-011c0b9f1296@example.com>",
                "from": "info@example.com",
                "to": "user@example.jp",
                "senderIp": "",
                "status": "queued"
            }
        ]
    }
}
メール送信完了時
Customers Mail Cloudからメール送信処理が行われると、ステータスが succeeded になったWebhookが送られてきます。
{
    "event_type": "deliveries",
    "server_composition": "pro",
    "event": {
        "deliveries": [
            {
                "reason": "",
                "sourceIp": "",
                "returnPath": "info@return.pro.smtps.jp",
                "created": "2023-01-25 14:03:09",
                "subject": "メールマガジンのテスト",
                "apiData": "",
                "messageId": "<031a32d4-06cd-b1ae-9526-011c0b9f1296@example.com>",
                "from": "info@example.com",
                "to": "user@example.jp",
                "senderIp": "100.100.100.3",
                "status": "succeeded"
            }
        ]
    }
}
メール送信失敗時(メールアドレス形式に問題がある場合)
メールアドレスの形式に問題があるなど、送信処理が失敗した場合には以下のようなWebhookが送られてきます。
{
    "event_type": "bounces",
    "server_composition": "pro",
    "event": {
        "bounces": [
            {
                "reason": "host unknown",
                "returnPath": "info@return.pro.smtps.jp",
                "created": "2023-01-25 14:05:15",
                "subject": "メールマガジンのテスト",
                "apiData": "",
                "messageId": "<8f902ee7-ae65-8711-48a8-2f708cb14205@example.com>",
                "from": "info@example.com",
                "to": "user@example",
                "status": "1"
            }
        ]
    }
}
メール送信失敗時(送信先サーバーからエラーが返ってくる場合)
ユーザーが存在しない、メールボックスがいっぱいなど送信先サーバーからエラーが返ってきた場合には、以下のようなJSONが返ってきます。
{
    "event_type": "deliveries",
    "server_composition": "pro",
    "event": {
        "deliveries": [
            {
                "reason": "550 5.1.1 The email account that you tried to reach does not exist. Please try 5.1.1 double-checking the recipient's email address for typos or 5.1.1 unnecessary spaces. Learn more at 5.1.1  <https://support.google.com/mail/?p=NoSuchUser> b197-20020a621bce000000b0058b80756b07si311029pfb.3 - gsmtp (in reply to RCPT TO)",
                "sourceIp": "",
                "returnPath": "info@return.pro.smtps.jp",
                "created": "2023-01-25 14:06:06",
                "subject": "メールマガジンのテスト",
                "apiData": "",
                "messageId": "<9e7e564c-ac83-8cd8-2cb4-b9ff2a9f168d@example.com>",
                "from": "info@example.com",
                "to": "no-user@example.jp",
                "senderIp": "100.100.100.3",
                "status": "failed"
            }
        ]
    }
}
エラーとしてのWebhookも送られてきます。上記のものと event_type が異なるので注意してください。
{
    "event_type": "bounces",
    "server_composition": "pro",
    "event": {
        "bounces": [
            {
                "reason": "550 5.1.1 The email account that you tried to reach does not exist. Please try 5.1.1 double-checking the recipient's email address for typos or 5.1.1 unnecessary spaces. Learn more at 5.1.1  <https://support.google.com/mail/?p=NoSuchUser> b197-20020a621bce000000b0058b80756b07si311029pfb.3 - gsmtp (in reply to RCPT TO)",
                "returnPath": "info@return.pro.smtps.jp",
                "created": "2023-01-25 14:06:07",
                "subject": "メールマガジンのテスト",
                "apiData": "",
                "messageId": "<9e7e564c-ac83-8cd8-2cb4-b9ff2a9f168d@example.com>",
                "from": "info@example.com",
                "to": "no-user@example.jp",
                "status": "2"
            }
        ]
    }
}
Google Cloud Functionsの準備
今回はローカルで開発する流れを紹介します。まず、適当なフォルダを作成します。今回はcmcとします。
mkdir cmc
cd cmc
ソース ディレクトリとソースファイルを格納するプロジェクト構造を作成します。
mkdir -p src/main/java/functions
touch src/main/java/functions/HelloWorld.java
HelloWorld.java を編集します。
package functions;

import com.google.cloud.functions.HttpFunction;
import com.google.cloud.functions.HttpRequest;
import com.google.cloud.functions.HttpResponse;
import java.io.BufferedWriter;
import java.io.IOException;

public class HelloWorld implements HttpFunction {
  @Override
  public void service(HttpRequest request, HttpResponse response)
      throws IOException {
    BufferedWriter writer = response.getWriter();
    writer.write("ok");
  }
}
次に build.gradle を作成します。
apply plugin: 'java'

repositories {
  jcenter()
  mavenCentral()
}
configurations {
    invoker
}

dependencies {
    // https://mvnrepository.com/artifact/com.google.code.gson/gson
    implementation group: 'com.google.code.gson', name: 'gson', version: '2.7'

  // Every function needs this dependency to get the Functions Framework API.
  compileOnly 'com.google.cloud.functions:functions-framework-api:1.1.0'

  // To run function locally using Functions Framework's local invoker
  invoker 'com.google.cloud.functions.invoker:java-function-invoker:1.3.1'

  // These dependencies are only used by the tests.
  testImplementation 'com.google.cloud.functions:functions-framework-api:1.1.0'
  testImplementation 'junit:junit:4.13.2'
  testImplementation 'com.google.truth:truth:1.4.0'
  testImplementation 'org.mockito:mockito-core:5.10.0'

}

// Register a "runFunction" task to run the function locally
tasks.register("runFunction", JavaExec) {
  main = 'com.google.cloud.functions.invoker.runner.Invoker'
  classpath(configurations.invoker)
  inputs.files(configurations.runtimeClasspath, sourceSets.main.output)
  args(
    '--target', project.findProperty('run.functionTarget') ?: '',
    '--port', project.findProperty('run.port') ?: 8080
  )
  doFirst {
    args('--classpath', files(configurations.runtimeClasspath, sourceSets.main.output).asPath)
  }
}
ライブラリをインストールします。
gradle build
そして、以下のようにコマンドを実行します。
gradle runFunction -Prun.functionTarget=functions.HelloWorld
これで、 http://localhost:8080 にてサーバーが立ち上がります。
Javaのコード
処理は HelloWorld.java の service 関数内に記述します。
public void service(HttpRequest request, HttpResponse response)
        throws IOException {
    BufferedWriter writer = response.getWriter();
    // ここに記述

    writer.write("ok");
}
送られてくるデータは request.getReader() で受け取れます。このJSON文字列を gson.fromJson でパースします。
JsonObject body = gson.fromJson(request.getReader(), JsonObject.class);
後は、このオブジェクトから必要な情報を取り出して処理を行います。
JsonObject body = gson.fromJson(request.getReader(), JsonObject.class);
String eventType = body.get("event_type").getAsString();
System.out.println(eventType); // deliveries
JsonObject event = body.get("event").getAsJsonObject();
JsonArray eventArray = event.get(eventType).getAsJsonArray();
JsonObject eventObj = eventArray.get(0).getAsJsonObject();
System.out.println(eventObj.get("subject").getAsString()); // メールマガジンのテスト
まとめ
Webhookを使うことで、メール送信ステータスの変化に応じて通知を受け取れるようになります。メールと連携したシステムを開発する際に役立つでしょう。
このWebhookはSMTP経由の場合、利用できます。ぜひご利用ください。
