Introduction
Nowadays, maintaining server has been more and more difficult than before. There are too many attackers and different kinds of attack methods from Internet. The server maintainers need to check security issues everyday, upgrade their servers, and also check machine health if they use physical machines.
Hopefully, we are now in a cloud world. There are lots of cloud services and we can combine them together to build our applications. With those cloud services, setting up and maintaining servers are no longer required!
In this post, I will introduce how to build a static website. This website can submit forms and send emails without setting up any servers. I call it “Serverless HTML Form” in this post. We will use Amazon Web Services (AWS) and Customers Mail Cloud (CMC) to build this application.
Serverless HTML Form
The image below shows the architecture of Serverless HTML Form. We will use some cloud services to implement this application. You can see that there are no servers in the architecture.
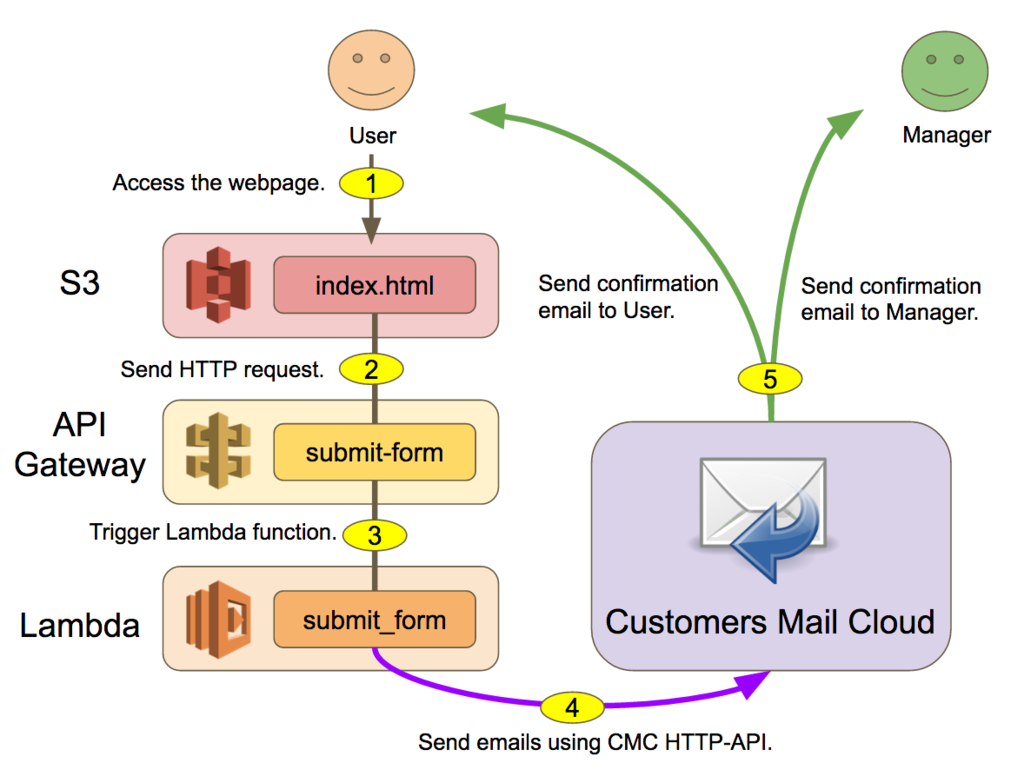
The workflow of Serverless HTML Form:
The user visits the webpage hosted on S3. The webpage contains the form for user to fill in his email, name and inquiry.
When the user clicks the submit button, the form will send an HTTP request with POST method to API Gateway endpoint.
API Gateway triggers the Lambda function and passes the data input by the user to the function. The Lambda function acts like the backend program in this application. It parses the input data and decides what to do.
If the input data is correct, the Lambda function calls CMC HTTP-API to send emails to the user and the manager.
CMC sends emails to the user and the manager.
Prerequisites
Amazon Web Services account with permissions to access:
Customers Mail Cloud (CMC) account. You can get a free account from here: https://smtps.jp/
An IAM role that have
AWSLambdaExecutepolicy.
Setup Customers Mail Cloud (CMC)
In this section, we will setup Customers Mail Cloud (CMC) and add an API user. CMC provides HTTP based API to send emails. With CMC, we can send an email by simply making an HTTP request!
If you are using the free account, you will need a domain in order to setup DKIM. Go to Menu > DKIM setting to add a new domain and get the setting of your domain.
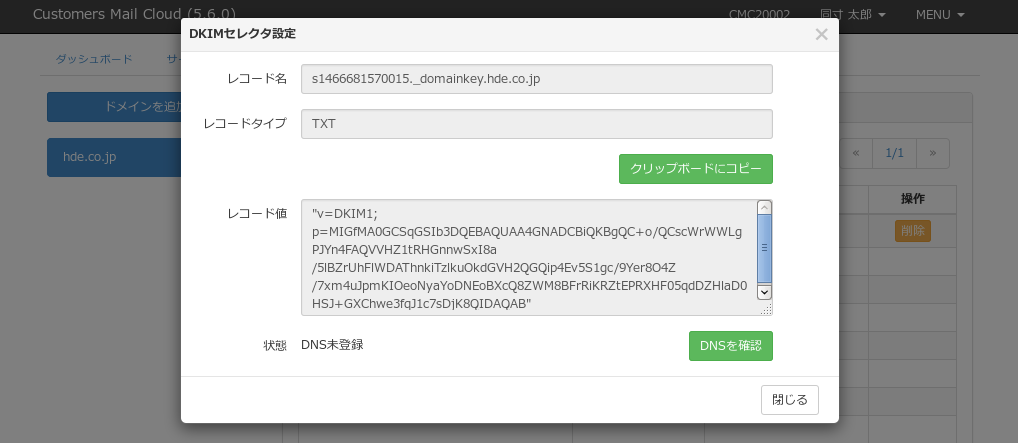
Go to Menu > API setting, and click “Add” to add an API user. Remember to check the “HTTP-API” to allow this API user calling HTTP-API.

Go to Menu > Server Configuration, click “Apply” to apply the settings.
To test CMC settings, CMC provides a webpage for you to send test emails. The URL is:
https://SUBDOMAIN.smtps.jp/api/v1/emails/send.html(Please change “SUBDOMAIN” to your domain. If you use the Standard plan, use “sandbox” as your SUBDOMAIN.)
Or, you can use the following Python3 script to send test emails.
from urllib.parse import urlencode
from urllib.request import urlopen

API_USER = ''
API_KEY = ''
EMAIL = ''
ENDPOINT = 'https://SUBDOMAIN.smtps.jp/api/v1/emails/send.json'

payload = {
    'api_user': API_USER,
    'api_key':  API_KEY,
    'to':       EMAIL,
    'from':     '{"name": "", "address": "' + EMAIL + '"}',
    'subject':  'test email',
    'text':     'test content',
}
resp = urlopen(ENDPOINT, data=urlencode(payload).encode())
print(resp.read())
Setup AWS Lambda
In this section, we will write a short Python code and upload it to AWS Lambda.
Click “Create a Lambda function” in the AWS Lambda console. In the “Select blueprint” page, choose “Blank Function” because we will write code by ourselves.

In the “Configure triggers” page, do nothing but click Next. We will set the trigger when we setup API Gateway.
In the “Configure function” page, fill in the function name you want (e.g.
submit_form) and set the runtime toPython 3.6. Here is the Python code:
from urllib.parse import urlencode
from urllib.request import urlopen
import json
import os
import re

MANAGER_EMAIL = os.environ['MANAGER_EMAIL']
CMC_USER = os.environ['CMC_USER']
CMC_KEY = os.environ['CMC_KEY']
CMC_ENDPOINT = os.environ['CMC_ENDPOINT']
CMC_SENDFROM = os.environ['CMC_SENDFROM']

CONTENT_TO_USER = '''\
Dear {name}:

We have received your inquiry.
Thank you for your help!

Below is your inquiry:
===================================
{inquiry}
===================================
'''
CONTENT_TO_MANAGER = '''\
A user just send an inquiry.

Name: {name}
Email: {email}

Inquiry:
===================================
{inquiry}
===================================
'''

def cmc_sendmail(email_to, subject, content):
    payload = {
        'api_user': CMC_USER,
        'api_key': CMC_KEY,
        'to': email_to,
        'from': json.dumps({'name': '', 'address': CMC_SENDFROM}),
        'subject': subject,
        'text': content,
    }
    resp = urlopen(CMC_ENDPOINT, data=urlencode(payload).encode())
    body = json.loads(resp.read())

    print('mail to "%s" with subject "%s"' % (email_to, subject))
    print('    status_code =', resp.code)
    print('    text =', body)
    return body['id']


def lambda_handler(event, context):
    # Verify the information that input by user.
    email = event['email']
    name = event['name']
    inquiry = event['inquiry']
    if not re.search('^[a-zA-Z0-9_\.+-]+@[a-zA-Z0-9\.-]+\.[a-zA-Z]+$', email):
        return {
            'success': False,
            'message': 'The email address is in invalid format.',
        }

    # Send emails.
    cmc_sendmail(
        email,
        'We have received your inquiry',
        CONTENT_TO_USER.format(name=name, inquiry=inquiry),
    )
    cmc_sendmail(
        MANAGER_EMAIL,
        'New Inquiry',
        CONTENT_TO_MANAGER.format(name=name, email=email, inquiry=inquiry),
    )

    return {'success': True}
- At the bottom of "Configure function" page, there are 5 environment variables we need to set.
MANAGER_EMAIL: The email address of the manager.CMC_USER: The API user name you set in CMC.CMC_KEY: The API Key of the user in CMC.CMC_ENDPOINT: The endpoint of CMC Email Sending API. It looks likehttps://{SUBDOMAIN}.smtps.jp/v1/emails/send.json.CMC_SENDFROM: The “FROM” header you want to use when sending the email. If you don’t know what is this, you can fill the manager’s email address here.
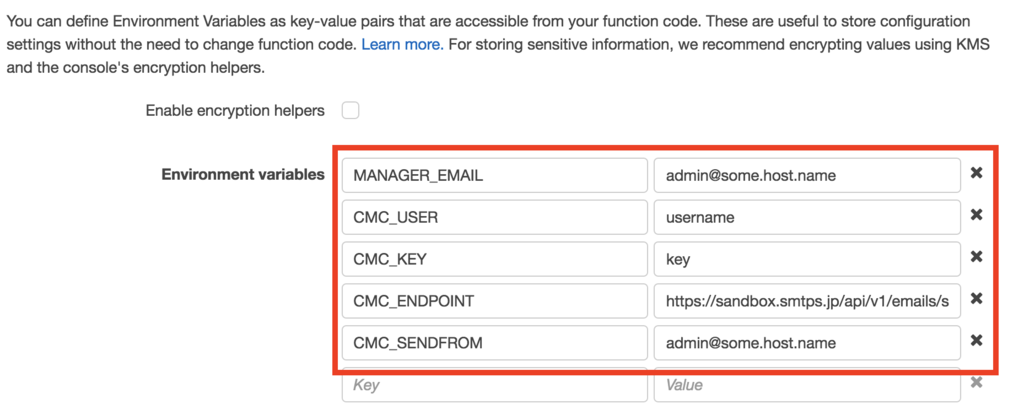
- In the "Lambda function handler and role" section, choose the IAM role that have the `AWSLambdaExecute` policy. Our Lambda function will be executed by that role.
- Click Next, and click "Create Function". Now, our Lambda function is created!
- If you want to test the Lambda function, you can configure the test event and then invoke the function manually by clicking "Test" button.
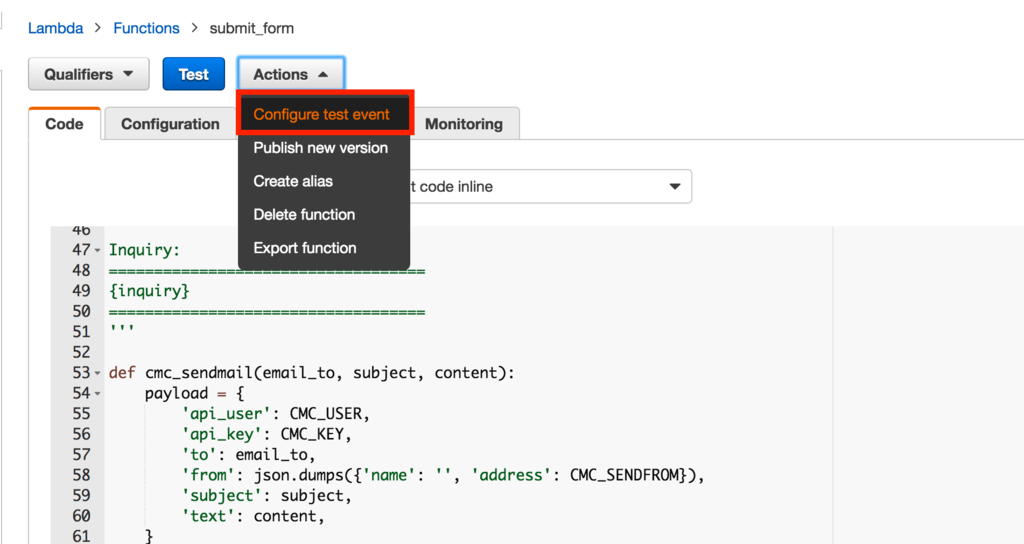
Fill in the input test event like this.

Setup Amazon API Gateway
Create an API by clicking “Create API” in the Amazon API Gateway console.
In the “Resources” page, create a resource under
/and give it a name (e.g.submit-form).Create a method under that resource and choose POST because our website will submit the form using POST method.
In the setup page when creating method, choose “Lambda Function” for the integration type. Then, select the Lambda region and fill in the Lambda Function name you created in the previous section. Therefore, API Gateway will trigger our Lambda function when it receives a request.

Because this API will be called from a browser, we should enable CORS to allow the browser calling this API. Choose your resource and click Actions > Enable CORS.
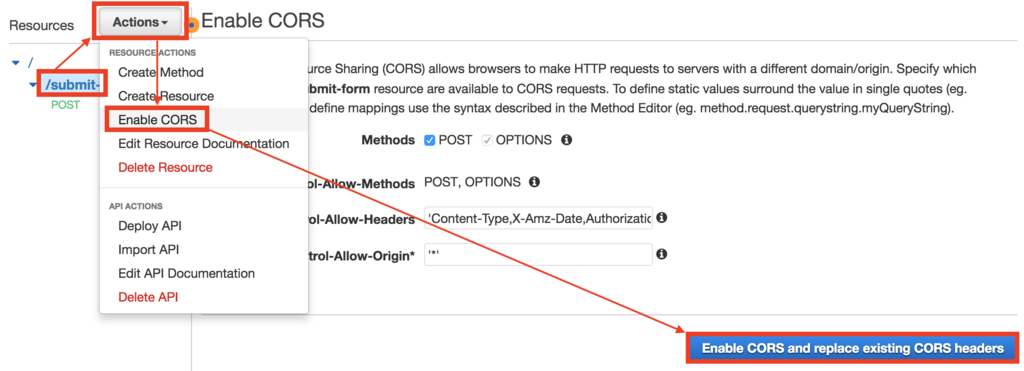
We have done setting the API. Now, we need to deploy it. API Gateway deploys an API to a stage. To deploy the API, click Actions > Deploy API.

After deploy the API, you can find the endpoint in Stages page. It looks like:
https://{API_ID}.execute-api.{REGION}.amazonaws.com/{STAGE_NAME}/{RESOURCE_NAME}If your want to test API Gateway, you can click the “TEST” button in the setting page.

Fill in the Request Body like this, and click Test to test.

Deploy HTML form on Amazon S3
We will use “Static website hosting” feature to host the static website which contains our HTML form.
- First of all, we need to write our
index.html. Here is the HTML code of our form.
<form>
    <div class="form-group">
        <label for="email">Email address</label>
        <input type="email" class="form-control" id="email" name="email"
         placeholder="Email" />
    </div>
    <div class="form-group">
        <label for="name">Name</label>
        <input type="text" class="form-control" id="name" name="name"
         placeholder="Name" />
    </div>
    <div class="form-group">
        <label for="inquiry">Inquiry</label>
        <textarea class="form-control" rows="5" id="inquiry" name="inquiry"
         placeholder="Your Inquiry"></textarea>
    </div>
    <div class="form-group">
        <button type="submit" class="btn btn-success">Submit</button>
    </div>
    <div id="message"></div>
</form>
-
Because API Gateway is very unfriendly to
application/x-www-form-urlencoded, let's use jQuery to collect the data and use AJAX to submit the form withapplication/json.
// Please fill in the endpoint you got from API Gateway here.
var API_GATEWAY_ENDPOINT = '{API_GATEWAY_ENDPOINT}';

function show_message(type, message) {
    $('#message').empty().append(
        $('<div class="alert alert-' + type + '" role="alert">').text(message)
    );
}

$(function() {
    $('form').submit(function(event) {
        event.preventDefault();
        $.ajax({
            url: API_GATEWAY_ENDPOINT,
            method: 'post',
            data: JSON.stringify({
                email: $('#email').val(),
                name: $('#name').val(),
                inquiry: $('#inquiry').val()
            }),
            contentType: 'application/json'
        })
        .done(function(data) {
            if(data.success == true) {
                show_message('success', 'Your inquiry has been sent!!');
            } else {
                show_message('danger', data.message);
            }
        })
        .fail(function(data) {
            show_message('danger', 'Failed to send inquiry.')
        });
    });
});
- Create a bucket in Amazon S3. Turn on "Static website hosting" feature in the bucket properties tab.

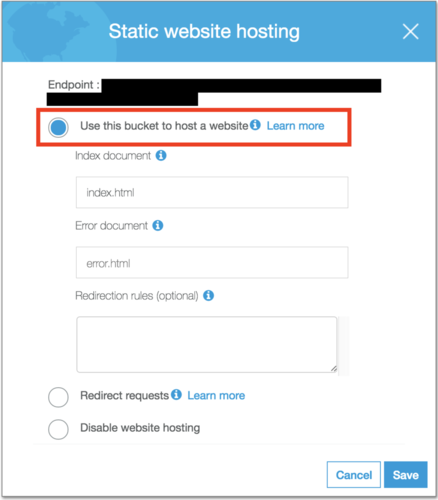
-
Upload
index.html. Set the permissions to "Everyone can read the object" when uploading so everyone can see your form via Internet.
NOTE: Please be careful not to locate any sensitive data in the bucket. Otherwise, the confidential data will be open to the public.
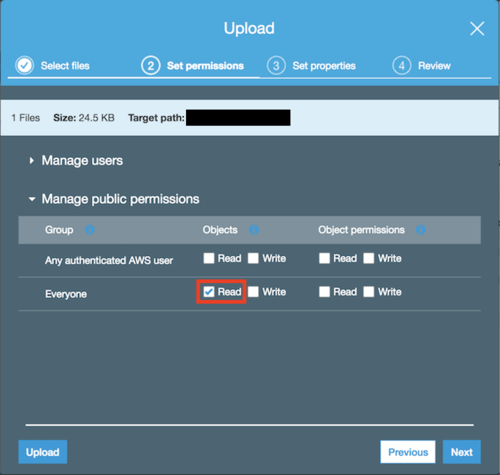
- You can get the link by viewing the object detail. That is the entrance of our application.

We are done!
Have fun with your Serverless HTML Form!
